
Introduction to Oreo Butterfinger Icebox Pie
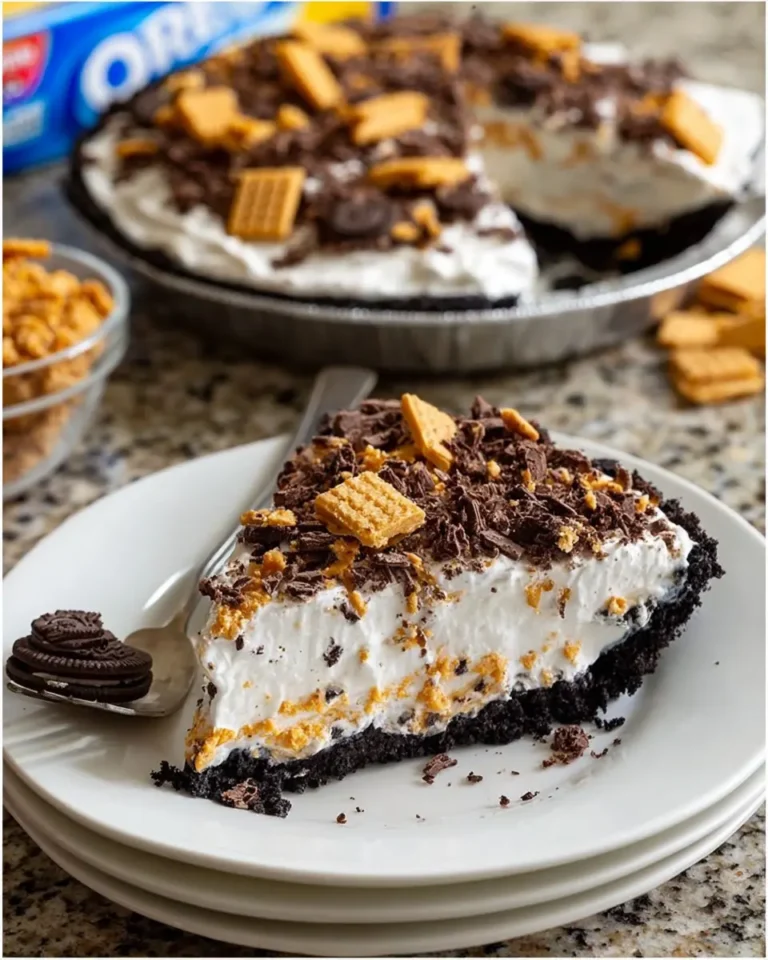
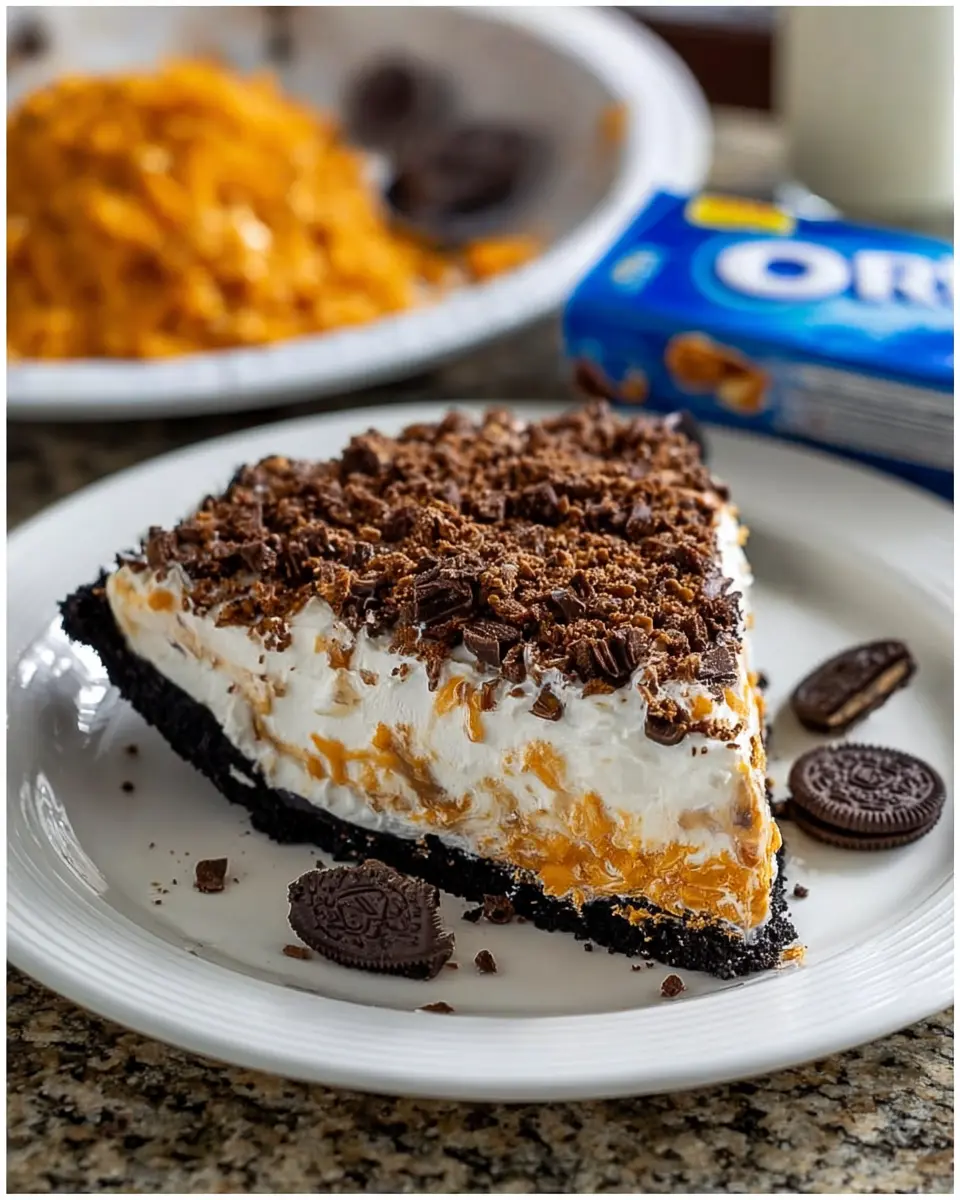
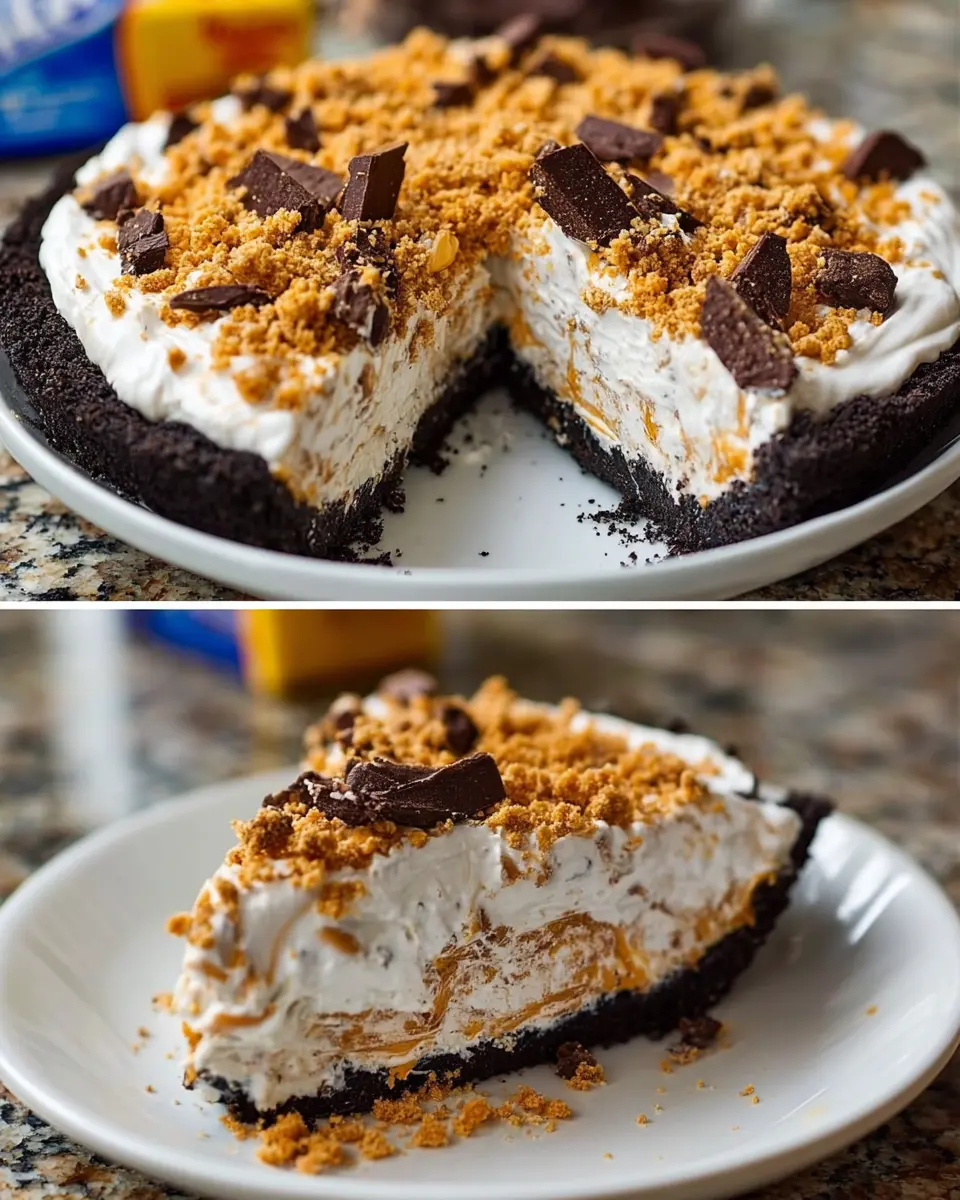
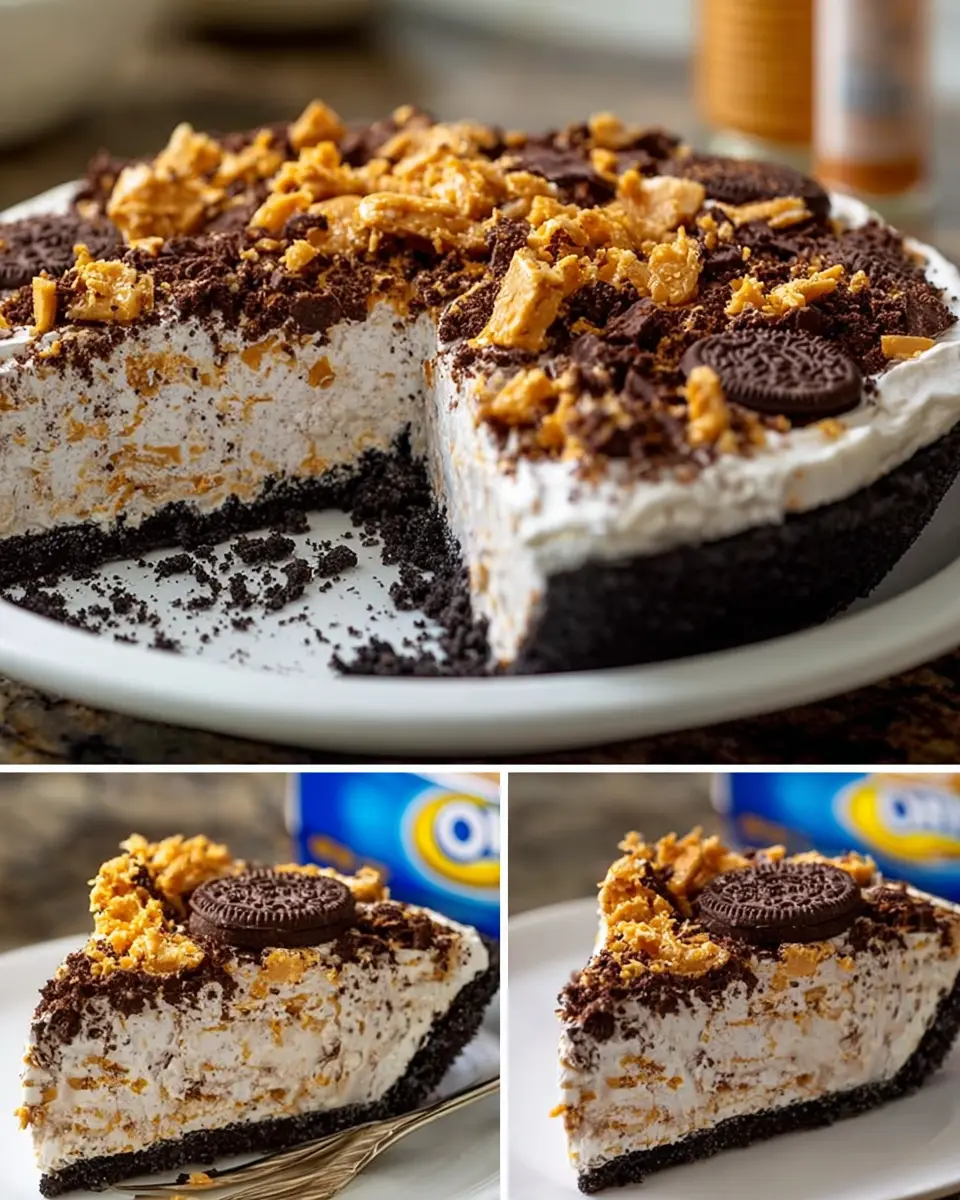
If you’re on the lookout for a dessert that balances decadence and simplicity, look no further than the Oreo Butterfinger Icebox Pie. This pie epitomizes the dream of every sweet-toothed individual, effortlessly combining flavors and textures that will make your taste buds dance. Imagine biting into a creamy, dreamy filling anchored by a rich Oreo crust and a delightful crunch from Butterfinger candy bits—sounds irresistible, right?
Why Oreo Butterfinger Icebox Pie is a must-try dessert?
There are several reasons why this Oreo Butterfinger Icebox Pie deserves a spot on your dessert table. First and foremost, it’s the perfect no-bake recipe for those warm evenings when you want something sweet without heating up the kitchen. The only “cooking” you’ll be doing is in the mixing bowl, which means more time enjoying the company of friends or family.
But the appeal doesn’t stop at convenience. This pie strikes a wonderful balance between creamy and crispy, thanks to its combination of smooth filling and crunchy toppings. The Oreo crust provides a deep chocolatey base, while the Butterfinger pieces scattered throughout add a delightful crunch that elevates each bite. When you slice into this beauty, you’ll see the layers of flavor come to life, making each scoop a treat for the eyes as much as for the palate.
Plus, if you’re looking to impress your guests at your next get-together, this dessert will certainly do the trick. It’s easy to cut into slices and serve, making it a hassle-free option that allows you to focus on what really matters—enjoying time with your loved ones.
It’s no wonder that icebox pies have been beloved in households for generations. If you want to dive deeper into the history and variations of pie, check out The Pie Council for some interesting insights.
So, are you ready to whip up your very own Oreo Butterfinger Icebox Pie? Stick around, and I’ll guide you step-by-step through this delightful experience!
Ingredients for Oreo Butterfinger Icebox Pie
If you’re looking for a deliciously easy dessert to impress your friends, the Oreo Butterfinger Icebox Pie is a fantastic option! Let’s break down what you’ll need to whip up this creamy, crunchy masterpiece.
Key Ingredients
- Oreo Cookies: About 24 regular Oreos for the crust. You might want extra for topping too, because who doesn’t love more Oreos?
- Butter: One stick of unsalted butter, melted, to give the crust that perfect, indulgent flavor.
- Cream Cheese: 8 ounces of softened cream cheese helps create a rich, creamy filling. Make sure it’s softened for the best texture!
- Whipped Topping: A tub of whipped topping (like Cool Whip) adds a light, airy texture. You can even make your own if you’re feeling adventurous!
- Butterfinger Bars: Two to three bars, chopped up, to mix into the filling and sprinkle on top for that crunchy finish.
- Confectioners’ Sugar: About 1 cup to sweeten the filling just right.
Preparation Tips
- Get all your ingredients prepped before starting. It makes the process smoother, trust me!
- For extra flair, consider drizzling chocolate sauce over the top once it’s chilled.
This Oreo Butterfinger Icebox Pie is not just a treat; it’s an experience waiting to happen. For more inspiration on delightful desserts, check out resources like the Food Network or Serious Eats. Enjoy your delicious creation!
Step-by-Step Preparation of Oreo Butterfinger Icebox Pie
Creating an Oreo Butterfinger Icebox Pie is not just about the final delicious product; it’s also about enjoying the process! Whether you’re preparing for a summer barbecue or a cozy movie night, this dessert is bound to impress your friends and family. Let’s dive into the step-by-step preparation of this delightful treat!
Gather the ingredients
First things first, let’s gather the necessary ingredients. This pie is not only delicious but also easy to make. Here’s what you will need:
- 1 package of Oreo cookies
- 4 Butterfinger candy bars
- 8 oz cream cheese, softened
- 1 cup powdered sugar
- 8 oz whipped topping (thawed)
- 1 ready-made pie crust (9-inch, preferably graham cracker or chocolate)
Having everything ready makes the preparation smoother and more enjoyable!
Crush the chocolate peanut butter candy bars
Now that you have your ingredients laid out, it’s time to start crushing those Butterfinger candy bars. You can do this by:
- Placing the candy bars in a sealed plastic bag and using a rolling pin to crush them.
- Alternatively, you can use a food processor for a more uniform texture.
Whichever method you choose, make sure the pieces aren’t too large; you want to enjoy the crunch without overwhelming the pie’s flavor.
Beat the cream cheese until smooth
In a mixing bowl, beat the softened cream cheese with a hand mixer (or stand mixer) until it’s creamy and smooth. This step is crucial as a well-beaten cream cheese will give your pie a velvety texture. Trust me, taking the time to beat it well makes all the difference!
Mix in the powdered sugar
Next, gradually add in the powdered sugar while continuing to beat the mixture. This step sweetens up the cream cheese and creates a delightful, creamy filling. Make sure to taste it along the way—it’s hard not to sneak a spoonful!
Fold in the whipped topping
Once the cream cheese and powdered sugar combination is smooth, gently fold in the whipped topping using a spatula. Be careful not to overmix here; you want to keep that light and airy texture intact. It’s the key to a luscious filling that won’t weigh down your pie.
Combine the crushed candy bars with the filling
Now comes the fun part! Fold in the previously crushed Butterfinger candy bars into the cream cheese mixture. This is where your Oreo Butterfinger Icebox Pie starts to embody its delightful flavors. The bits of candy bar add a fun texture and a burst of peanut butter and chocolate flavor!
Spoon the filling into the pie crust
With your filling ready, scoop it into the prepared pie crust. Use a spatula to evenly spread it out, ensuring it fills all corners. Don’t rush this step—taking your time guarantees that each slice will have that perfect blend of Oreo, candy, and cream filling.
Top the pie with remaining crushed candy bars
If you saved some of the crushed Butterfinger from earlier, sprinkle the remaining bits on top. Not only does this make your pie visually appealing, but it also adds an inviting crunch to each slice. It’s the cherry on top—well, the Butterfinger on top, to be precise!
Chill the pie in the refrigerator
Cover your pie with plastic wrap and pop it into the refrigerator. Letting it chill for about 4 hours (or overnight if you can resist) allows the flavors to meld beautifully. Plus, a chilled pie is pure perfection on a warm day.
Slice and serve the pie
Once it’s properly chilled, slice your Oreo Butterfinger Icebox Pie into generous portions, and serve it to your eager friends and family. Trust me, they’ll be amazed at how easy and delicious this dessert is!
So, there you have it—a straightforward guide to preparing an Oreo Butterfinger Icebox Pie that is sure to wow anyone lucky enough to receive a slice. Happy baking! For more delightful dessert recipes, check out sources like Food Network and Taste of Home.
Variations on Oreo Butterfinger Icebox Pie
Creating the perfect Oreo Butterfinger Icebox Pie is just the beginning of your culinary adventure. Once you’ve mastered the basics, it’s fun to explore some mouthwatering variations that can add a unique twist to this classic dessert. Let’s dive into a couple of exciting ideas!
Add a layer of chocolate ganache
One easy way to elevate your Oreo Butterfinger Icebox Pie is by incorporating a rich layer of chocolate ganache. This silky coating not only enhances the chocolate flavor but also adds an appealing glossy finish. To make it, simply heat equal parts heavy cream and semisweet chocolate over low heat until smooth. Once cooled, spread the ganache over the top layer of your pie before adding the toppings. This ganache layer can also help to keep your pie from becoming too sweet, balancing the flavors beautifully.
Experiment with different candy bar toppings
While Butterfinger brings a nostalgic crunch to the table, why not mix it up? Try using other candy bars like Reese’s Peanut Butter Cups for a nutty twist or Snickers for a delightful caramel taste. Consider even M&Ms or crushed pretzels for a fun crunch! Each topping variation can completely transform the flavor profile. Just layer it on before serving for a fun and colorful touch. Don’t be afraid to get creative—your guests will love the surprises you whip up!
In sum, these variations not only make your Oreo Butterfinger Icebox Pie more personalized, but they also open the door to a world of flavor possibilities. For more inspiration, check out Food Network or Cooking Light for ideas on how to zhuzh up your dessert game even further!
Baking Tips and Notes for Oreo Butterfinger Icebox Pie
Making an Oreo Butterfinger Icebox Pie? You’re in for a treat! Here are some friendly tips to ensure your dessert shines.
Choose the Right Ingredients
- Quality Oreos: Opt for regular Oreos for a classic flavor. You can even try the seasonal varieties for a twist.
- Cream Cheese: Use softened cream cheese for a smoother filling. This adds a lovely texture that complements the Butterfinger crunch.
The Perfect Assembly
- Even Layers: When layering your ingredients, take your time. Even layers not only look good but also help in achieving balanced flavor with each slice.
- Chill Time: Patience can be tough in baking, but letting your pie chill for at least four hours ensures a firm consistency. It makes slicing easier, too!
Personal Touches
Feel free to experiment! Maybe add some chopped Nuts or drizzle chocolate on top before serving. Want to dive deeper into flavor combinations? Check out this resource on flavor pairings for some inspiration.
Remember, the goal is to enjoy the process of making your Oreo Butterfinger Icebox Pie. Share it with friends and family; it’s bound to be a hit!
Serving Suggestions for Oreo Butterfinger Icebox Pie
When it comes to serving your Oreo Butterfinger Icebox Pie, presentation is just as important as taste. This delightful treat is perfect for gatherings, so here are some ideas to make it shine.
Pairing Ideas
-
Fresh Berries: Serve your pie alongside a mix of strawberries, blueberries, and raspberries. The tartness complements the rich flavors beautifully.
-
Cool Whip: A dollop of whipped cream or Cool Whip on each slice can elevate your dessert experience. It’s light and fluffy, softening the pie’s creaminess.
-
Chocolate Sauce: Drizzling a bit of chocolate sauce over the pie or on the plate adds an extra element of indulgence.
-
Ice Cream: Consider serving slices with a scoop of vanilla or chocolate ice cream. The blend of textures will wow your guests.
Make It Festive
Feeling creative? Top your pie with seasonal decorations like crushed candy canes for the holidays or colorful sprinkles for birthdays. Visual appeal adds excitement, making this Oreo Butterfinger Icebox Pie not just a dessert but a centerpiece!
These simple serving suggestions can transform a delicious pie into a memorable dining experience. For more inspiration, check out The Kitchn’s guide on dessert presentation for helpful tips!
Time Breakdown for Oreo Butterfinger Icebox Pie
Preparation time
Creating your Oreo Butterfinger Icebox Pie is a breeze and will take you about 15-20 minutes in the kitchen. Gather your ingredients, pull out your mixing bowls, and you’ll be blending and layering in no time. Don’t forget to measure twice to ensure that perfect balance of flavors!
Chilling time
Once you’ve assembled your pie, it needs to chill for 4-6 hours. That’s your time to relax or tackle other chores. The chilling is crucial as it helps the pie set and allows the flavors to meld together beautifully.
Total time
From start to finish, your Oreo Butterfinger Icebox Pie will take approximately 4 hours and 30 minutes. This includes prep and chilling, making it a quick and satisfying dessert option that’s perfect for gatherings. Think of it as an excellent opportunity to impress your friends or enjoy a sweet treat during a cozy night in.
For additional tips on preparing desserts efficiently, consider checking out resources like Serious Eats or Food Network.
Nutritional Facts for Oreo Butterfinger Icebox Pie
Calories per Slice
When indulging in a slice of Oreo Butterfinger Icebox Pie, be prepared for a delightful treat that carries about 320 calories per slice. If you’re keeping an eye on your calorie intake, this pie provides a satisfying yet rich experience.
Sugars
With sweet layers of both Oreo and Butterfinger, you can expect around 24 grams of sugar per slice. While it’s definitely on the sweeter side, it’s great to enjoy in moderation, especially for special occasions!
Protein
As for protein, this Oreo Butterfinger Icebox Pie offers about 3 grams per slice. It’s not a significant source of protein, but it does pack a punch in flavor, making it a decadent dessert option for that post-dinner delight.
For a more balanced dessert, consider pairing it with some fresh fruit or a dollop of yogurt to amp up the nutritional profile! Want to dive deeper into the nutritional benefits of dessert? Check out Nutrition.gov for more tips.
FAQs about Oreo Butterfinger Icebox Pie
How do I store leftover icebox pie?
Storing your Oreo Butterfinger Icebox Pie is super easy! After you’ve enjoyed your dessert, cover it tightly with plastic wrap or aluminum foil and place it in the refrigerator. This pie is best served chilled, so it’ll stay fresh for about 3 to 5 days. If you’re feeling adventurous, consider freezing it! Just make sure to wrap it properly to prevent freezer burn. When you’re ready to enjoy it again, let it thaw in the fridge for a few hours. Trust me, that creamy goodness is worth the wait!
Can I use different types of candy bars?
Absolutely! One of the best features of this Oreo Butterfinger Icebox Pie is its versatility. Feel free to swap out Butterfinger for your favorite candy bars like Snickers, Milky Way, or even Reese’s Peanut Butter Cups. Each option will yield a unique flavor that can cater to everyone’s sweet tooth. Experimentation is key here—who wouldn’t love a pie that reflects their favorite candy? For inspiration, check out this list of popular candy bars.
What can I substitute for the cream cheese?
If you’re looking to change up the ingredients in your Oreo Butterfinger Icebox Pie, cream cheese can be substituted! Options like Greek yogurt or mascarpone cheese provide a creamy texture and tangy flavor similar to cream cheese. If you’re dairy-free, try using a vegan cream cheese alternative, which works surprisingly well. Just keep in mind that the taste might vary slightly, but it’ll still be delicious!
Whether you’re whipping this pie up for a gathering or just a treat for yourself, these FAQs should help smooth out any questions you have. Happy baking!
Conclusion on Oreo Butterfinger Icebox Pie
The Oreo Butterfinger Icebox Pie is more than just a dessert; it’s an experience that’s simple yet indulgent. Whether you’re celebrating a birthday or hosting a casual summer gathering, this pie is bound to impress. Its creamy texture pairs seamlessly with the crunchy layers of Oreo and Butterfinger, creating a delightful contrast you won’t soon forget.
As you whip it up, don’t be afraid to personalize the recipe with your favorite toppings! Perhaps a drizzle of caramel for extra sweetness or freshly whipped cream to elevate the flavors. Visit FoodNetwork for more tips and variations. Why not make this pie your go-to for quick gatherings? It’s a guaranteed crowd-pleaser!
PrintOreo Butterfinger Icebox Pie: The Indulgent No-Bake Delight

A delightful no-bake dessert featuring the rich flavors of Oreo and Butterfinger.
- Prep Time: 15 minutes
- Cook Time: 0 minutes
- Total Time: 4 hours 15 minutes
- Yield: 8 servings 1x
- Category: Dessert
- Method: No-Bake
- Cuisine: American
- Diet: Vegetarian
Ingredients
- 1 package Oreo cookies
- 1/2 cup unsalted butter, melted
- 1 cup creamy peanut butter
- 1 cup powdered sugar
- 8 ounces cream cheese, softened
- 1 cup whipped topping
- 1/2 cup Butterfinger candy bars, crushed
Instructions
- Preheat the refrigerator.
- Crush the Oreo cookies and mix with melted butter, then press into a pie dish to form the crust.
- In a bowl, mix peanut butter, powdered sugar, and cream cheese until smooth.
- Fold in the whipped topping and crushed Butterfinger.
- Spread the filling over the Oreo crust.
- Chill in the refrigerator for at least 4 hours before serving.
Notes
- For a richer flavor, use natural peanut butter.
- Add more crushed Butterfinger on top for extra crunch.
Nutrition
- Serving Size: 1 slice
- Calories: 350
- Sugar: 25g
- Sodium: 200mg
- Fat: 20g
- Saturated Fat: 10g
- Unsaturated Fat: 8g
- Trans Fat: 0g
- Carbohydrates: 30g
- Fiber: 2g
- Protein: 5g
- Cholesterol: 30mg
Keywords: Oreo Butterfinger Icebox Pie, no-bake dessert, Oreo pie, Butterfinger pie