
Introduction and Preparation
Pumpkin Pie Crisp is a delightful twist on the traditional pumpkin pie, combining the creamy, spiced goodness of pumpkin pie filling with a crunchy, buttery crumble topping. This dish has become a seasonal favorite, especially during the fall and holiday seasons, when the craving for pumpkin spice and comforting desserts is at its peak.
What makes Pumpkin Pie Crisp so popular during this time of year? It’s the perfect blend of textures—smooth and velvety filling paired with a sweet, crumbly topping. Plus, it’s easier to make than a traditional pie since there’s no need for a crust. This dessert is ideal for Thanksgiving and other holiday gatherings, offering a familiar yet exciting option that will impress your guests.
For those interested in using healthier ingredients, consider coconut sugar as a substitute for white sugar. It’s a lower glycemic option, making it a better choice for those looking to reduce sugar intake during the holidays. Learn more about the benefits of coconut sugar.
Ingredients Overview
Before diving into the recipe, let’s go over the key ingredients you’ll need:
Main Ingredients for the Filling:
- Pumpkin Puree: You can use either canned or fresh pumpkin puree. Canned pumpkin is convenient and consistent, but fresh pumpkin can offer a more robust flavor.
- Coconut Sugar: A healthier alternative to white sugar, it provides a rich, caramel-like flavor. It’s also less processed and has a lower glycemic index.
- Eggs: These give the filling its structure and richness.
- Pumpkin Pie Spice: A blend of cinnamon, nutmeg, ginger, and cloves that infuses the filling with warm, autumnal flavors.
- Vanilla Extract: Enhances the overall flavor profile of the filling.
- Almond Milk: A dairy-free alternative that keeps the filling creamy without the need for regular milk.
Ingredients for the Crumble Topping:
- Gluten-Free Flour Blend: Ideal for those with gluten sensitivities. You can also use regular flour if preferred.
- Coconut Sugar: Adds sweetness to the crumble, balancing out the spices in the filling.
- Cinnamon: Adds a warm, spiced note to the topping.
- Plant-Based Butter: Keeps the crumble dairy-free while ensuring it’s still rich and flavorful. Explore the best vegan butter substitutes.
Optional Toppings and Alternatives:
- Vanilla Bean Ice Cream: Opt for dairy-free varieties if needed.
- Cool Whip: Available in both regular and dairy-free versions.
- Chopped Nuts: For added crunch and flavor, consider adding chopped pecans or walnuts to the topping.
Tools Needed
To make your Pumpkin Pie Crisp, you’ll need the following kitchen tools:
- Large Mixing Bowl: For preparing the pumpkin filling.
- Medium Mixing Bowl: For mixing the crumble topping.
- 10-inch Cast Iron Skillet or Medium Casserole Dish: These options are perfect for baking the crisp, providing even heat distribution.
- Whisk: Essential for combining ingredients smoothly.
- Spatula: For spreading the filling and topping evenly.
Alternatives for Specific Tools:
- If you don’t have a cast iron skillet, any oven-safe baking dish will work just as well.
- A hand mixer can be used instead of a whisk for a more thorough blend.
With these ingredients and tools ready, you’re all set to create a delicious Pumpkin Pie Crisp that’s perfect for any fall or holiday gathering.
Step-by-Step Recipe
Preparing the Pumpkin Filling
Creating the perfect Pumpkin Pie Crisp starts with a rich and flavorful filling. Follow these detailed instructions to ensure your filling is smooth, creamy, and packed with that delicious pumpkin spice flavor.
Step-by-Step Instructions:
- Gather Ingredients:
- 15 oz pumpkin puree (canned or fresh)
- 1 cup coconut sugar
- 3 large eggs
- 2 tsp pumpkin pie spice
- 1/4 tsp sea salt
- 2 tsp vanilla extract
- 1/3 cup plain unsweetened almond milk
- Combine Wet Ingredients:
- In a large mixing bowl, whisk together the pumpkin puree, coconut sugar, eggs, pumpkin pie spice, sea salt, and vanilla extract until well combined.
- Gradually add in the almond milk, whisking continuously to ensure a smooth mixture. This step helps achieve a creamy consistency without any lumps.
- Adjust for Taste:
- Taste the mixture and adjust the spices or sweetness if needed. If you prefer a stronger spice flavor, add a pinch more of pumpkin pie spice.
- For a richer filling, you can substitute almond milk with coconut milk or regular dairy milk, depending on your dietary needs.
Tips for the Best Texture and Flavor:
- Use Room Temperature Ingredients: This helps the filling mix together more evenly, reducing the risk of curdling or separation.
- Avoid Overmixing: Whisk the filling just until the ingredients are combined. Overmixing can incorporate too much air, leading to a less dense filling.
- Rest the Mixture: Let the filling sit for 5-10 minutes before pouring it into your baking dish. This allows the flavors to meld together more thoroughly.
For those looking for a lower glycemic option, consider using coconut sugar as your sweetener of choice.
Making the Crumble Topping
The crumble topping is what sets Pumpkin Pie Crisp apart from a traditional pie, adding a delightful crunch that complements the smooth filling. Here’s how to create the perfect crumble topping.
Step-by-Step Instructions:
- Gather Ingredients:
- 1 1/2 cups gluten-free flour blend (or regular flour)
- 1 cup coconut sugar
- 2 tsp cinnamon
- 1/4 tsp sea salt
- 8 Tbsp plant-based butter, melted (or regular butter)
- Mix Dry Ingredients:
- In a medium mixing bowl, combine the gluten-free flour, coconut sugar, cinnamon, and sea salt. Use a fork or whisk to ensure the ingredients are evenly distributed.
- Add Melted Butter:
- Pour the melted plant-based butter into the dry mixture. Stir gently with a fork until the mixture starts to come together into a crumbly texture.
- The crumble should be slightly moist but still able to hold its shape when pressed together.
- Customize for Dietary Needs:
- For a Vegan Version: Stick with the plant-based butter. You can also use a mixture of almond flour and oats instead of a gluten-free flour blend for added texture.
- For a Lower Sugar Option: Substitute half of the coconut sugar with a low-calorie sweetener like monk fruit sweetener, but be aware that this might slightly alter the texture.
Tips for a Perfect Crumble:
- Chill Before Use: If your kitchen is warm, consider chilling the crumble mixture for 10-15 minutes before spreading it over the filling. This helps the topping stay crumbly rather than melting into the filling.
- Test the Texture: Pinch a bit of the crumble between your fingers. If it clumps together easily but still falls apart with a little pressure, it’s ready to use.
- Adjust for Sweetness: Taste a small bit of the crumble mixture. If you prefer a sweeter topping, add a touch more coconut sugar.
For those who need tips on finding the best vegan butter substitutes, check out this guide to vegan butter.
By following these steps, you’ll create a delectable Pumpkin Pie Crisp that’s sure to be a hit at your next holiday gathering.
Step-by-Step Recipe
Preparing the Pumpkin Filling
Creating the pumpkin filling is a straightforward process that begins with gathering all your ingredients and tools. Here’s how to do it:
- Combine Ingredients: In a large mixing bowl, add the pumpkin puree, coconut sugar, eggs, pumpkin pie spice, sea salt, vanilla extract, and almond milk. Use a whisk to thoroughly combine these ingredients until the mixture is smooth and free of lumps.
- Whisking Tips: To achieve the best texture, whisk the mixture vigorously. This helps to incorporate air into the filling, giving it a light, creamy consistency. Be sure to scrape down the sides of the bowl to ensure all ingredients are fully incorporated.
- Adjusting for Sweetness: Taste the filling before pouring it into the baking dish. If you prefer a sweeter filling, you can add a bit more coconut sugar or adjust the spices to suit your taste.
- Enhancing Flavor: For a deeper flavor, consider letting the filling rest for 10-15 minutes before baking. This allows the spices to meld together, enriching the overall taste. If you’re using fresh pumpkin puree, be sure to strain it to remove excess moisture, which can affect the texture of the filling.
By following these steps, you’ll create a filling that’s rich, flavorful, and the perfect base for your Pumpkin Pie Crisp.
Making the Crumble Topping
The crumble topping is what sets Pumpkin Pie Crisp apart from traditional pies, adding a delightful crunch that contrasts with the creamy filling. Here’s how to make it:
- Mix Dry Ingredients: In a medium mixing bowl, combine the gluten-free flour blend, coconut sugar, cinnamon, and sea salt. Stir the ingredients together until they are evenly distributed.
- Add the Butter: Melt the plant-based butter and slowly pour it into the dry mixture. Use a fork or your hands to mix the ingredients until they form a crumbly texture. The mixture should hold together slightly when pressed but still be loose enough to sprinkle over the filling.
- Achieving the Perfect Crumble: To create the perfect crumble, avoid overmixing. Overworking the butter into the flour can cause the topping to become too dense. Instead, aim for a mix that has a variety of small and larger crumbs for a more textured topping.
- Dietary Variations: For those on a vegan diet, make sure to use a vegan butter substitute like Earth Balance. If you’re looking to reduce sugar, consider using a mix of monk fruit sweetener and coconut sugar to maintain the crumble’s texture while cutting down on sugar content.
- Optional Add-ins: For added texture and flavor, you can mix in chopped nuts like pecans or walnuts into the crumble. These add a satisfying crunch and pair well with the spices in the filling.
With these steps, your crumble topping will be the perfect complement to the creamy pumpkin filling, adding that irresistible crunch that makes this dessert a hit.
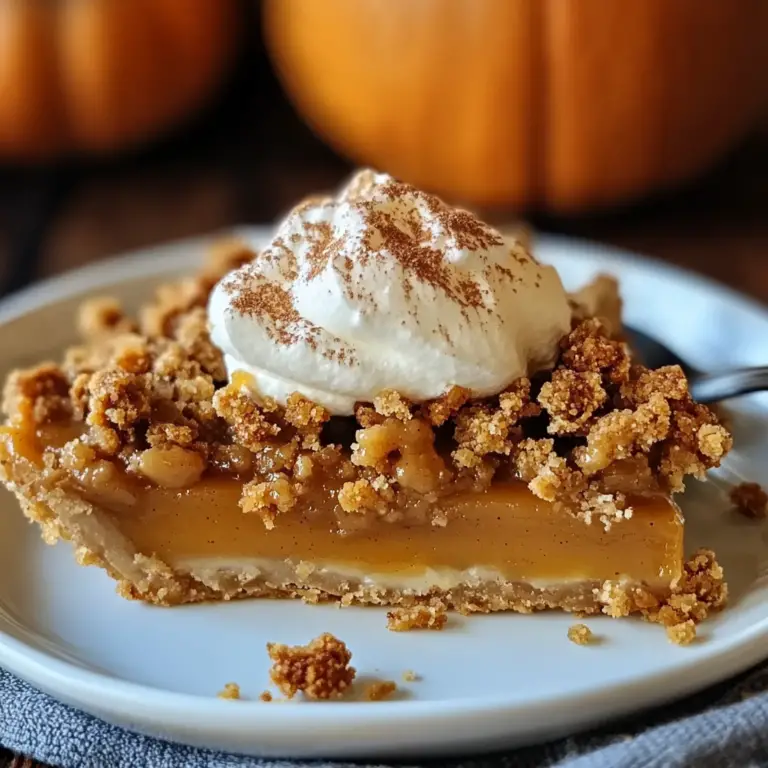
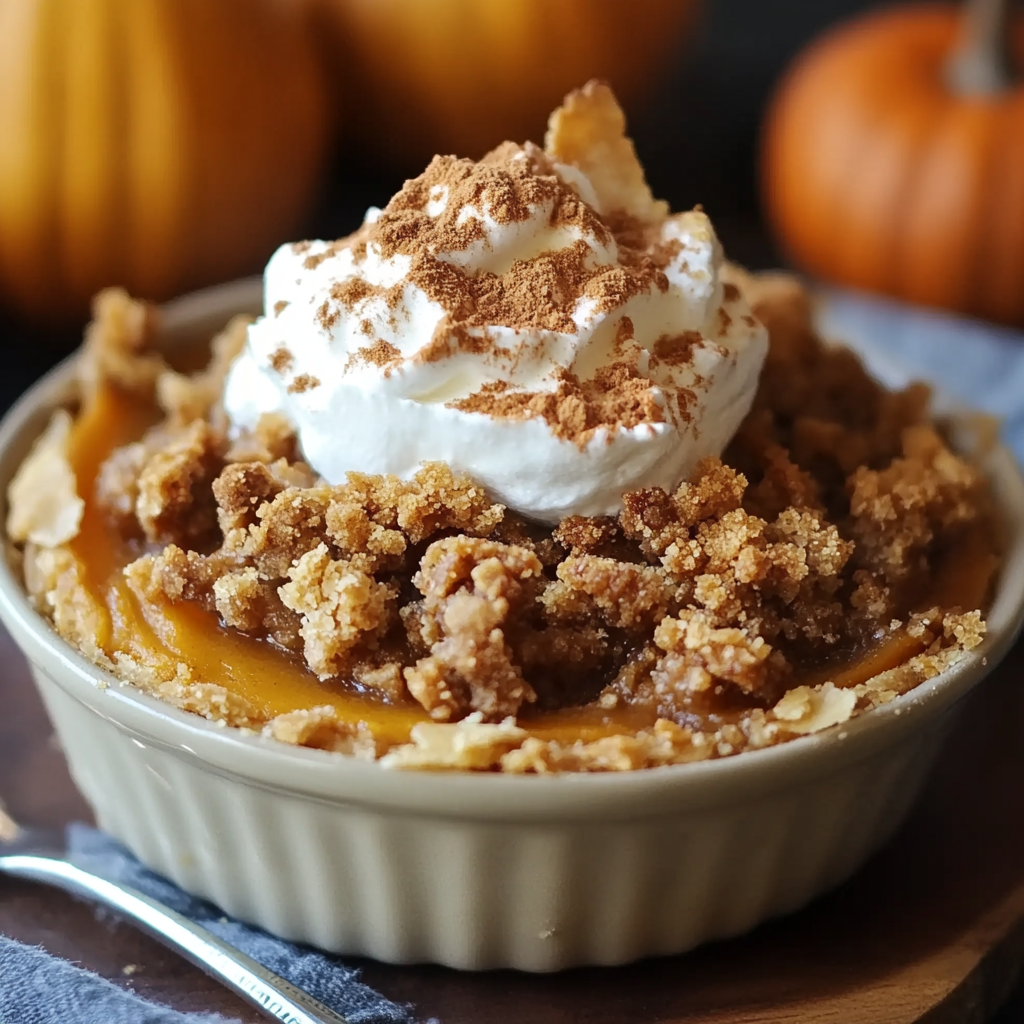
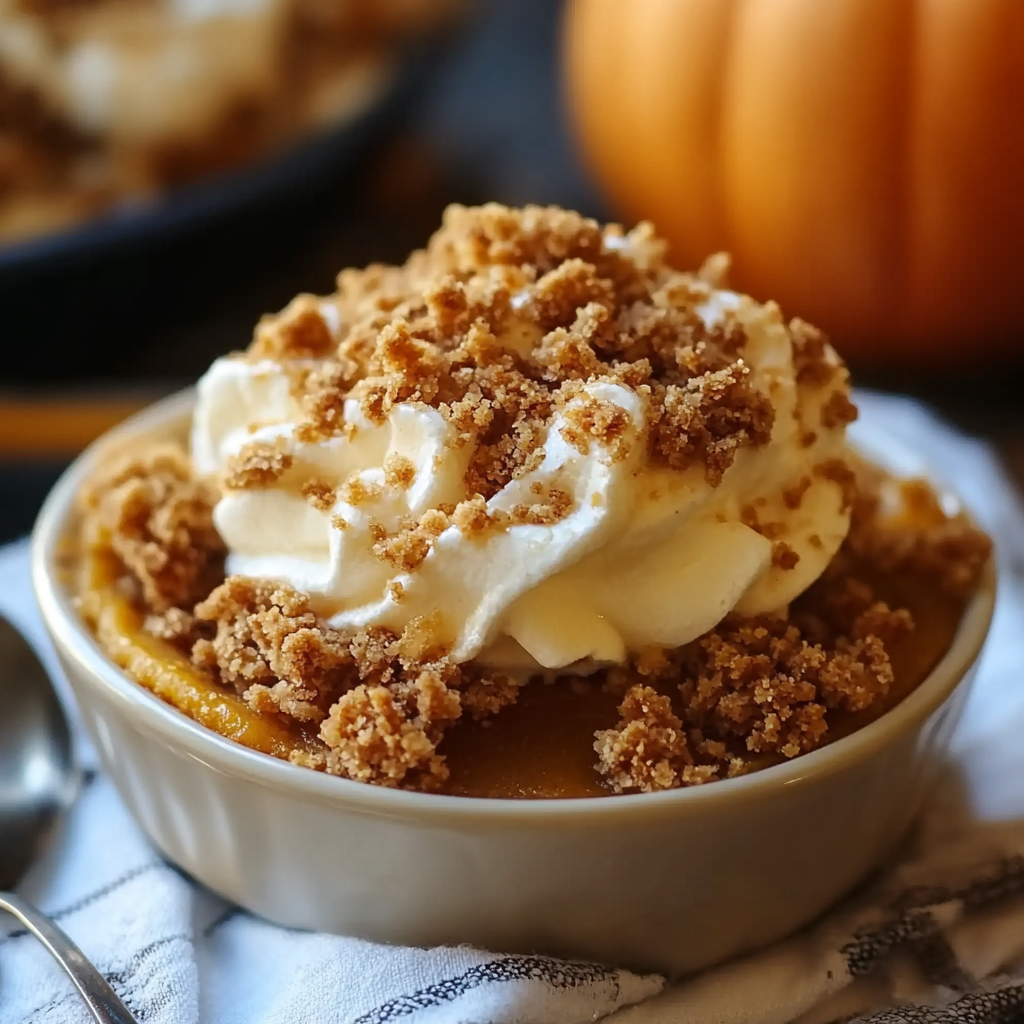
Assembling and Baking the Crisp
Now that your pumpkin filling and crumble topping are ready, it’s time to assemble and bake your Pumpkin Pie Crisp. This step is crucial to achieving the perfect balance between a creamy interior and a crunchy topping.
Layering the Filling and Crumble
- Prepare the Baking Dish: Preheat your oven to 375°F (190°C). Lightly grease your 10-inch cast iron skillet or medium casserole dish with non-stick cooking spray. This will prevent the filling from sticking to the sides and ensure easy serving.
- Pour the Filling: Carefully pour the prepared pumpkin filling into the greased baking dish. Use a spatula to spread it evenly across the bottom. Make sure the filling is level to ensure even baking.
- Add the Crumble Topping: Take the crumble mixture and evenly sprinkle it over the pumpkin filling. Aim for a uniform layer, covering the entire surface. The key is to ensure the crumble is not too thick in any one area, as this could lead to uneven baking.
Baking Times and Temperature Tips
- Baking Time: Place the dish in the preheated oven and bake for 45 minutes. The filling should set and the top should turn a golden brown. If you notice the top browning too quickly, you can loosely cover it with aluminum foil for the remainder of the baking time.
- Check for Doneness: To check if the filling is fully baked, insert a toothpick or knife into the center. It should come out mostly clean, with just a few moist crumbs clinging to it. The filling will continue to set as it cools.
Troubleshooting Common Issues
- Soggy Topping: If your topping turns out soggy, it could be due to too much moisture in the filling or an uneven crumble layer. Ensure your pumpkin puree is well-drained and that the crumble is evenly distributed.
- Uneven Baking: If the filling is undercooked in the center, but the topping is done, reduce the oven temperature to 350°F (175°C) and continue baking for an additional 10-15 minutes. This allows the filling to cook through without burning the topping.
- Crisp Topping Tips: For an extra-crisp topping, you can place the crisp under the broiler for 1-2 minutes at the end of the baking time. Keep a close eye on it to prevent burning.
By following these steps, you’ll achieve a perfectly balanced Pumpkin Pie Crisp with a creamy, spiced filling and a golden, crunchy topping that’s sure to impress.
Serving Suggestions
When it comes to serving Pumpkin Pie Crisp, you want to enhance the warm, spiced flavors with the right accompaniments:
- Serve Warm: Pumpkin Pie Crisp is best served warm, fresh out of the oven. The contrast between the hot filling and the crunchy topping is simply irresistible.
- Top It Off: Add a scoop of vanilla bean ice cream or a dollop of Cool Whip to each serving. The cool creaminess of the ice cream or whipped topping complements the warmth of the crisp, creating a delightful contrast. For a dairy-free option, choose dairy-free vanilla ice cream.
- Pair with Beverages: A hot cup of coffee, spiced cider, or a glass of mulled wine pairs perfectly with the rich, autumnal flavors of the crisp. These beverages enhance the spices in the filling and make for a cozy, comforting dessert experience.
Storage and Reheating Tips
To keep your Pumpkin Pie Crisp fresh, follow these storage and reheating tips:
- Storing Leftovers: Allow the crisp to cool completely before covering it with plastic wrap or aluminum foil. Store it in the refrigerator, where it will keep for up to 4 days. If you prefer, you can also store individual portions in airtight containers.
- Reheating Instructions: To reheat, preheat your oven to 350°F (175°C). Place the crisp in an oven-safe dish and cover it loosely with aluminum foil to prevent the topping from burning. Heat for 10-15 minutes, or until warmed through. For a quicker option, you can reheat individual portions in the microwave for about 1-2 minutes, though the topping may lose some of its crispness.
By following these storage and reheating tips, your Pumpkin Pie Crisp will remain as delicious as when it was first baked, ensuring you can enjoy this comforting dessert throughout the week.
FAQs and Additional Tips
Can I use fresh pumpkin instead of canned?
Yes, you can definitely use fresh pumpkin puree instead of canned. To do this, you’ll need to roast or steam a small sugar pumpkin (often labeled as pie pumpkin), then blend the flesh until smooth. Be sure to strain the puree to remove any excess moisture, as fresh pumpkin tends to be more watery than canned. This will ensure your Pumpkin Pie Crisp has the right texture and consistency.
How do I make this recipe vegan?
To make this Pumpkin Pie Crisp vegan, simply substitute the eggs and butter. Replace the eggs with a flax egg (1 tablespoon of ground flaxseed mixed with 3 tablespoons of water for each egg) or use a commercial egg replacer. For the butter, use a high-quality vegan butter substitute, such as Earth Balance, which works well in both the filling and the crumble topping. These swaps will keep the texture and flavor intact while making the dessert suitable for a vegan diet.
What can I use instead of coconut sugar?
If you don’t have coconut sugar on hand or prefer a different sweetener, you have several options. You can use brown sugar, which will provide a similar deep, caramel-like flavor, or opt for maple syrup for a slightly different taste. If you’re looking for a low-calorie option, consider using a mix of monk fruit sweetener and coconut sugar, which can help reduce the overall sugar content while maintaining a great texture and taste.
Additional Tips and Tricks
Expert Tips for the Best Pumpkin Pie Crisp
- Use Cold Butter: For the crumble topping, using cold butter (or a cold vegan butter substitute) will help achieve a perfectly crumbly texture. If the butter melts too much, the topping can become dense and less crispy.
- Pre-Bake the Filling: For an extra-thick filling, consider pre-baking the pumpkin filling for about 10 minutes before adding the crumble topping. This ensures the filling is fully set and not too runny.
- Enhance the Flavor: Add a splash of bourbon or dark rum to the filling for a richer, more complex flavor that pairs wonderfully with the spices.
Common Mistakes to Avoid
- Overmixing the Crumble: Overmixing can lead to a dense, less crispy topping. Mix just until the ingredients are combined and crumbly.
- Skipping the Cooling Time: Allow the crisp to cool slightly before serving. This helps the filling to set properly and prevents it from being too runny.
By following these tips and avoiding common mistakes, your Pumpkin Pie Crisp will turn out perfectly every time, ensuring a delicious and crowd-pleasing dessert.